> For the complete documentation index, see [llms.txt](https://support.powerio.com/hub/llms.txt). Markdown versions of documentation pages are available by appending `.md` to page URLs; this page is available as [Markdown](https://support.powerio.com/hub/orbit/en/projects/projekte/projekt-anlegen.md).
# Create and structure a project
How to create a new project in powerIO Orbit and structure it with collections and items, until every system has its own place in the project tree.
Create the project in the section **Projects** and the levels below it via the context menu in the project tree. A typical structure is building, trade, and system.
## Prerequisites
* You are signed in to powerIO Orbit.
* Your role allows you to edit the project tree, for example **Customer admin**, **Project admin** or **Project manager**.
## Create project
{% stepper %}
{% step %}
### Open the Projects area
Click in the sidebar on **Projects**. In the top right, select the view **Structure**.
{% endstep %}
{% step %}
### Open the New item dialog
In the header of the project tree, click next to **Structure** on the blue plus icon **New item**. The dialog **New item** appears.
{% endstep %}
{% step %}
### Set name and type
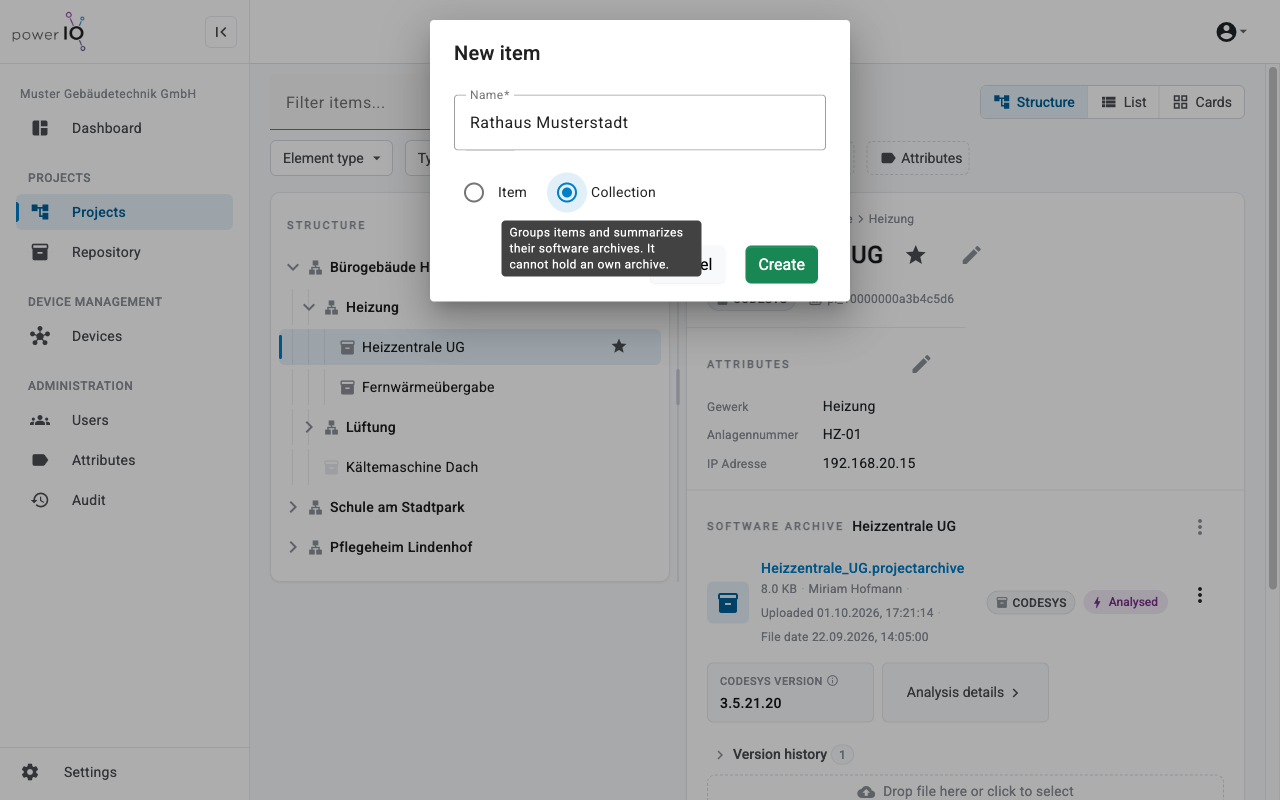
In the field **Name** the name of the project. Select the type **Collection**, so the project can structure further elements.
New item dialog with the Collection type
{% endstep %}
{% step %}
### Create project
Click on **Create**. The new project appears in the project tree.
{% endstep %}
{% endstepper %}
## Add collections and items
{% stepper %}
{% step %}
### Open context menu
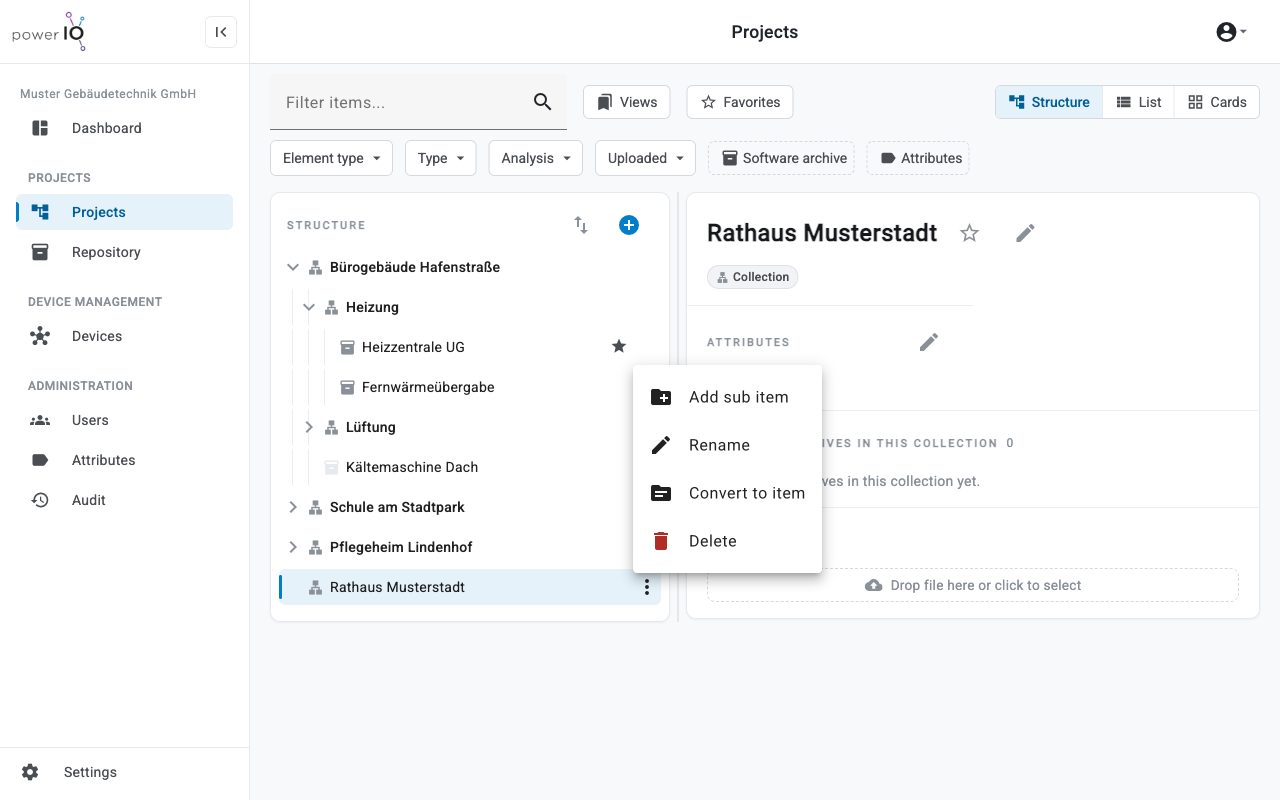
In the project tree, point to the parent element. On the right in the row, click the menu icon with the three dots. The context menu appears.
Context menu of an element in the project tree
{% endstep %}
{% step %}
### Create subitem
Click on **Add sub item**. The dialog **New sub item** appears.
{% endstep %}
{% step %}
### Set name and type
In the field **Name** enter the name. Select **Collection** for a hierarchy level or **Item** for a system with software archive.
{% endstep %}
{% step %}
### Create element
Click on **Create**. The element appears under the parent element.
{% endstep %}
{% endstepper %}
Repeat the steps until the tree reflects your system, for example project, trade, and system.
## Result
The project is shown with its collections and items in the project tree. When you select an item, Orbit shows the sections on the right **Software archive** and **Attachments** for upload.
## Change and move elements
An element's context menu offers additional commands.
| Command | Effect |
| ---------------------------------------------- | --------------------------------------------------------------------------------------------------------- |
| **Rename** | Changes the name of the element. |
| **Convert to collection**, **Convert to item** | Converts the type. An item with a software archive remains an item. |
| **Delete** | Deletes the element with all subelements. Depending on your plan, deleted elements go to the recycle bin. |
To move items, click the icon with the two arrows in the header of the project tree. Then move elements by drag and drop. In the context menu, the following are additionally available **Move up**, **Move down**, **Move item** and **Arrange subitems** available.
---
# Agent Instructions
This documentation is published with GitBook. GitBook is the documentation platform designed so that both humans and AI agents can read, navigate, and reason over technical content effectively. Learn more at gitbook.com.
## Querying This Documentation
If you need additional information that is not directly available in this page, you can query the documentation dynamically by asking a question.
Perform an HTTP GET request on the following URL with the `ask` and `goal` query parameters:
```
GET https://support.powerio.com/hub/orbit/en/projects/projekte/projekt-anlegen.md?ask=&goal=
```
`ask` is the immediate question: it should be specific, self-contained, and written in natural language.
`goal` is what the user is ultimately trying to achieve, the reason they need the answer. Sharing it helps GitBook give you a better, more relevant answer. A goal is most helpful when it describes the outcome the user wants rather than restating the question. For example, with `ask=how do I create an API token`, a goal like `build a script that syncs our docs to a CMS` lets GitBook tailor the answer to that use case.
The response will contain a direct answer to the question and relevant excerpts and sources from the documentation.
Use this mechanism when the answer is not explicitly present in the current page, you need clarification or additional context, or you want to retrieve related documentation sections.